I can’t believe we are at the end of the $100 Room Challenge, but I have sure enjoyed this month and getting to see what everyone has been doing on such a tight budget. Going into this challenge my biggest decision was using as much of stuff that I have on hand as possible. I spent a good bit of time on Pinterest looking at pictures of other people’s laundry room makeovers and every time I found something I liked I tried to think to myself “what all do I have on hand that I can use to make this”.
As I mentioned in week two, this room had become a dumping grounds of everything that didn’t have a spot since we moved into our house. So I spent plenty of time decluttering the laundry room.
Then I moved on to painting the laundry room in week three, I knew I couldn’t really afford to spend $100 on paint (that was what happened in the school room makeover) for this project so I checked to see what I had on hand. It didn’t go as I originally planned, but I am very pleased with the outcome of the colors!
So lets talk about the projects I completed in the laundry room.
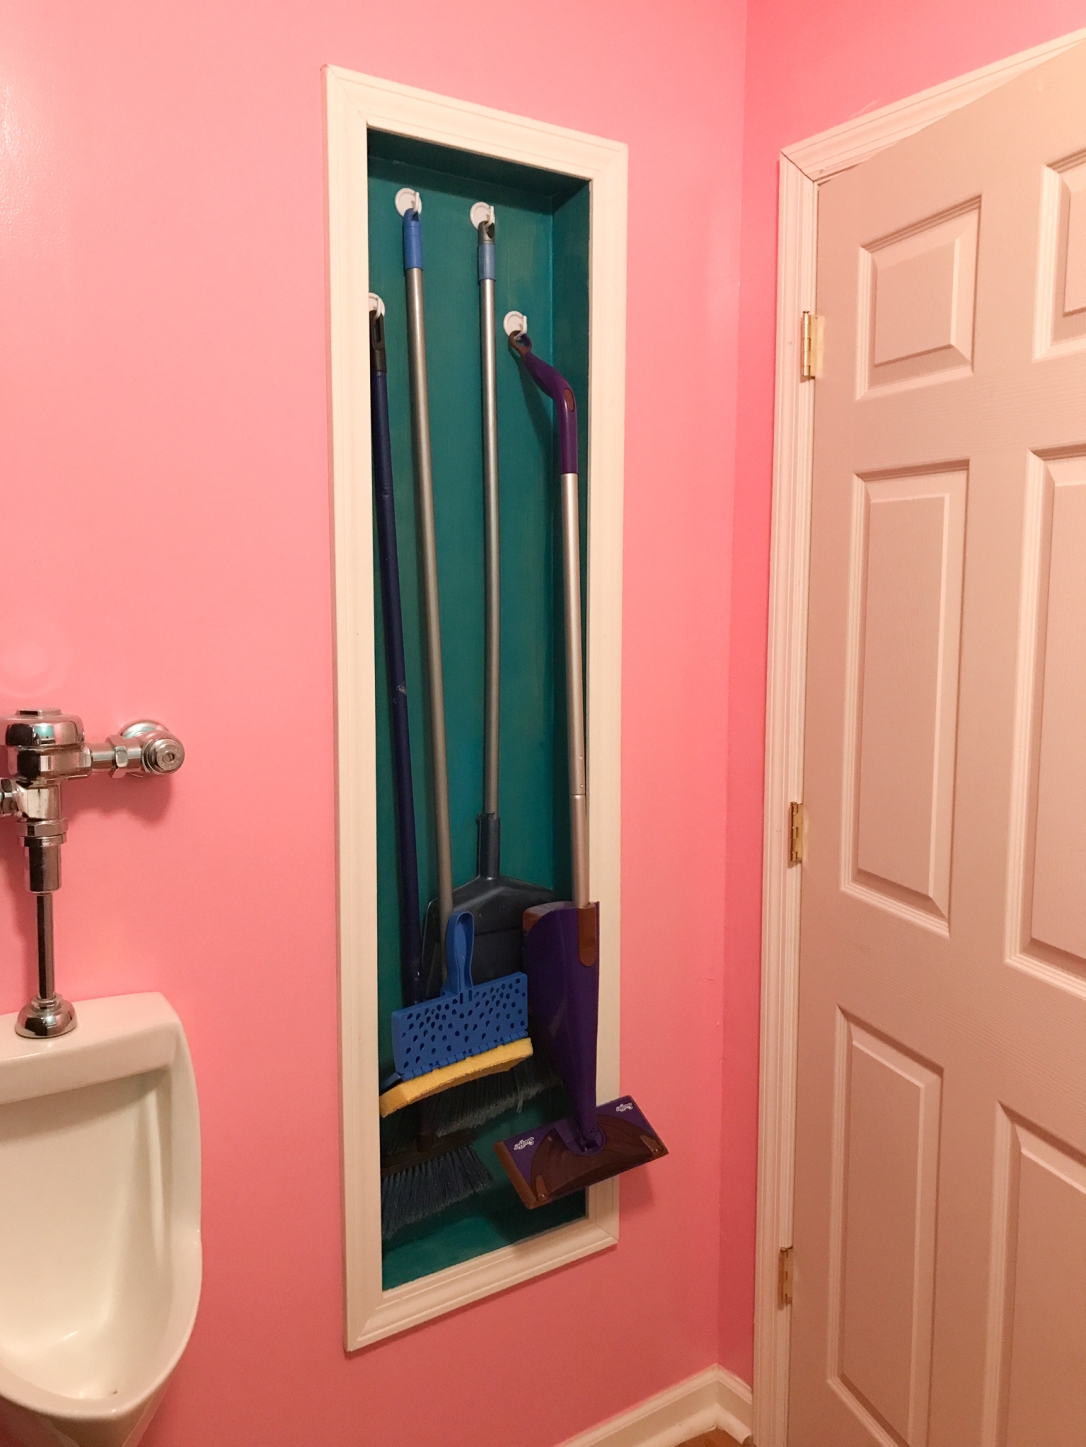
Between the Stud Closet
I promise I will have a post all about this closet in a few days. My family has been going through some stuff so I am a little behind on my blogging, but I will have it up in a few days. I had seen this closet on Pinterest for years and I just loved it!! I really wasn’t too sure about doing it. But when I talked to Adam he was pretty sure we could make it happen. I decided I didn’t want a door on it, because I knew my swiffer was shaped weird and I wasn’t sure the door would close with the swiffer in it. For this project I had to purchase the inside panelling wood, the trim and the hooks. We didn’t use much of the panelling wood, but I am excited to say I will be using the remainder of it for the RV repairs from the water damage.
- Panelling wood: $13.96
- Trim: $5.60
- Hooks: $1.96
- Paint: FREE (I had it on hand)

Floating Shelf
For years I have wanted a floating shelf in my laundry room. We always talked about at the old house, but we moved before we ever made over the laundry room. For the floating shelf we did it slightly different than how most tutorials show you online. Instead of using the paneling wood around the edge we decided to putty the edge, sand it down well and then paint it.
- Wood: FREE (some of the wood was scraps my husband had at his office and some of it was left over from the dog bed we made right after we moved)
- Paint: FREE (I had it on hand)

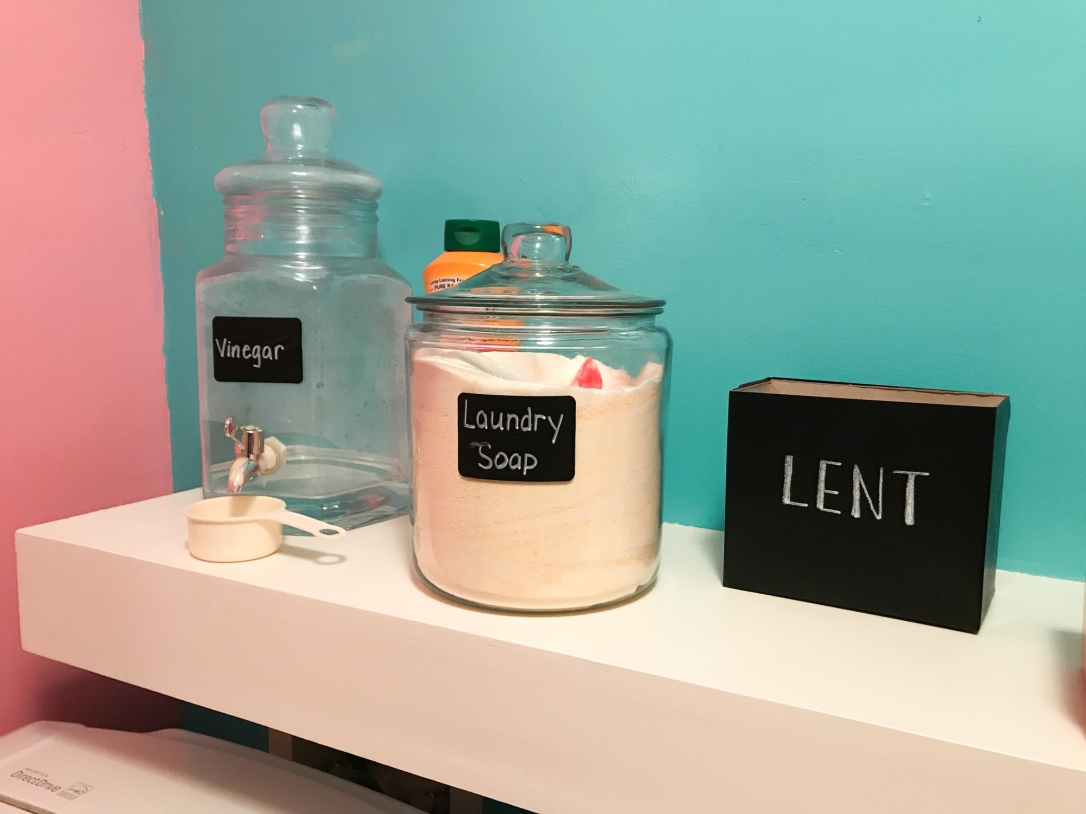
Shelf Organization
During this project we changed the recipe for our laundry soap (once I know I love it, I’ll share it). We use to make a liquid soap and my original plan was to put it in the drink dispenser. But we changed to a powder so I had to find something else to put it in. All the glassware was gathered from around the house. The labels on the glassware were some labels I purchased years ago and had on hand. I love to label everything so when I find a good deal on something I usually buy a good many of them. The lent box was made from a pop tart box and some vinyl I had on hand (I am going to share more about it soon as well).
- Glassware: FREE (gathered from around my house)
- Labels: FREE (already had on hand)
- Lent Box: FREE (made from recycled items and items on hand)
Laundry Sign
The one thing about taking out the wire shelf was where to hang the extra clothes hangers. I had seen this laundry sign on Pinterest and I knew I wanted to make something like it. I must say my son was a ton of help in making this. My original plan was to use PVC pipe. But I couldn’t find anything to use to attach the pipe to the wood. Then Noah mentioned using a wooden dowel and from there we figured out how to make it. The tall piece of wood was made from pieces leftover from when we had our privacy fence put up. I picked up the dowel from Hobby Lobby and the end is also from Hobby Lobby, but I had it on hand from when I purchased it years ago for a project and only used one then. I did the lettering with some vinyl I already had on hand.
- Wood: FREE (leftover from privacy fence)
- Dowel: $2.39
- End Cap: FREE (already had on hand)
- Paint: FREE (already had on hand)
- Vinyl: FREE (already had on hand)

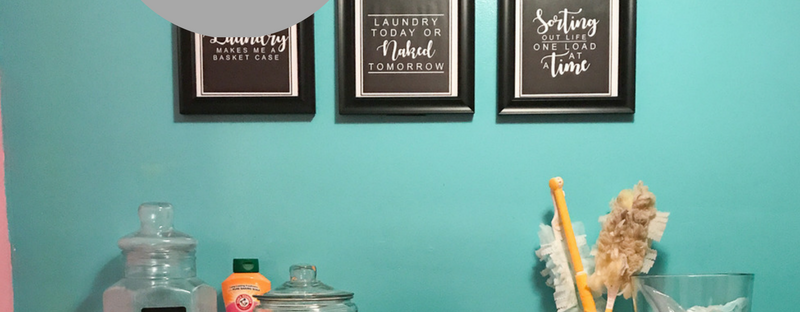
Art Work
The last thing I did was look for some art work for the room. I debated on creating a wall art with vinyl, however, life got the best of me and I had to come up with another idea. I had seen some cute FREE printables on Pinterest so I decided to go back and grab them for my art work and frame them. The first printable I found was this adorable Laundry Symbol Guide from Shannon at Everyday Best. I felt like it was fitting and I just loved the chalk look it had. The next printables I found were these cute sayings from Haley at The Mountain View Cottage. I didn’t use all of her printables, but I chose my favorite three to print and frame. Now I tried to be really thrifty with my frames, but they were probably the one thing I kinda splurged on, but they were 50% off at Hobby Lobby.
- Printables: FREE (make sure you check out the ladies blogs above if you are interested in printing your own)
- Frames: $23.06

Finally I cleaned off the top of the refrigerator and gathered the remaining supplies that needed to stay in the laundry room and organized them in two fabric boxes I already had on hand. I am super excited about how cute my room is and even more excited that I came in way below budget only spending $51.30!!! A few things I didn’t note above that I spent money on was the cap for the gas line and the outlet cover and light switch cover.


If you missed any of the previous weeks make sure to check them out and don’t forget to click the link below and see everyone’s else reveals!!


Hope your guys love your new space! Great job!
LikeLiked by 1 person
Thanks Elizabeth!! We so do!!
LikeLike
Hi, what a cute laundry room !! So cheery! Maybe it’s something I’m not familiar with but is that box for lint that comes out of the dryer? I swear I’m not trying to be snarky I’m just confused LOL . Again, great job!
LikeLiked by 1 person
Yes ma’am the box for lint is for lint out of the dryer. Late night finishing up and I misspelled it. 🙂 I took the trash can out of the laundry room, but needed something small for the lint when it comes out of the dryer. Thanks so much!!
LikeLike
Thanks! Very cute idea instead of the big trash can like I have.
LikeLiked by 1 person
Thank you!!
LikeLike
So fun!! I have my powdered laundry soap in that exact same canister! 😉
LikeLiked by 1 person
I love the canister!!
LikeLike
It looks way more organized than it did before! Great job!
LikeLiked by 1 person
Thanks Natalie!!
LikeLike
I love how bright and cheery this space is now! Great job!
LikeLiked by 1 person
Thank you Emy!!
LikeLike
I love how happy this room is! And I LOVE the laundry symbol guide!!
LikeLiked by 1 person
Thank you!!
LikeLike
wow what a tiny budget! That is awesome and it’s so bright and happy in there.
LikeLiked by 1 person
Thank you!!
LikeLike
So much nicer now! I love all the organization you incorporated.
LikeLiked by 1 person
Thank you!! I am excited to organize my pantry next!!
LikeLike
Looks great! I really like the storage solution for all your cleaning supplies!
LikeLiked by 1 person
Thank you!
LikeLike
You did a ton in here and did so much for so little cost. Love the floating shelf and framed printables (you can never go wrong with free printables!) And you came up with some great ideas for storage. The cleaning closet and that place to hang clothes. So glad you joined the challenge this round 🙂
LikeLiked by 1 person
Thanks Erin!! I had so much fun with the challenge and I am looking forward to doing it again.
LikeLike
You did such a good job and it’s such a happy room now! I love the DIY Laundry sign so much! You were very creative and used your money wisely!
LikeLiked by 1 person
Thanks Melissa!!
LikeLike
I love the little closet and floating shelf! This must feel like an entirely different room now. Great job!
LikeLike
Way to go, Sheena!! Love this laundry room makeover — what a pleasant space to work now. Glad to be co-hosting with you this month!
LikeLiked by 1 person
Thank you Ashley!!
LikeLike
Good morning Sheena! Just popping in from the #HomeMattersParty early today because we have Grandma and Grandpa coming for the weekend and I’m not sure when I’ll have time to get back to the party . . . . you’ve inspired me ;o) We are currently painting and updating our master bath and laundry room (they are kind of attached), and I’ve been kind of at a loss about what to do. You’ve given me lots of great ideas! I’m also hoping to participate in the next $100 room challenge – that sounds like a lot of fun and a great way to connect with other bloggers. Stop by when you have time to see some of the home update projects we’ve been working on. I’m so excited to finally get these projects done, but getting there takes a lot of time, energy, and money. See you next week at the party! Nina @ Vintage Mama’s Cottage
LikeLiked by 1 person
Hey Nina! I will have to check out the updates on your home. It’s does take a lot of time and money. I hope you will join us for the next challenge. Have a great weekend!!
LikeLike
Love the pops of color. Such a great makeover for $51.30 #HomeMattersParty
LikeLiked by 1 person
Thanks Sahana!!!
LikeLike
Amazing changes for such a small amount of money. There are so many free printables available these days for every room of the house. I’ll have to check out these Laundry ones. Stopping by from the #HomeMattersParty
LikeLiked by 1 person
Thanks Nicole!! I love finding free printable online!! Sometimes I’ll make them myself but when I don’t have time it’s always nice to find free ones from other bloggers.
LikeLike
Wow, it looks great! I love the bright colors. #HomeMattersParty
LikeLike